[UPDATED – added some extra findings and points in the conclusion]
In the previous post on the new Mac Pro, I explained how I created the Pro Tools test session and Logic test Project. In this post I will be comparing how Pro Tools 11 HD runs on a late 2007 Mac Pro and how this compares to running it on the new Mac Pro 2013. And in another post (coming soon) I’ll do exactly the same running Logic Pro X.
Before I dive into the tests and results, let me first give you the specifications of the machines. The 2007 Mac Pro is the first 8-core released by Apple. It has two Quad-core 3 GHz Xeon 5300 Clovertown processors running Mac OS X Mountain Lion 10.8.5 (see ‘Running Mountain Lion on a 2007 Mac Pro’ at the bottom of this post). The machine has 8 GB of RAM, a 5770 ATI Radeon Graphics card, and the session is located on a separate Seagate Barracuda 2 TB drive. Contemporary hard drives are extremely fast as we’ll see a bit later.

Specifications old and new Mac Pro
The other Mac is of course a late 2013 Mac Pro with a 6-core Xeon E5 1650 V2 ‘Ivy Bridge’ running at 3.5 GHz with Turbo Boost to 3.9 GHz. It has 16 GB of RAM, dual D300 AMD FirePro graphics cards, and I’m running the session off the same Seagate drive housed in a FireWire 800 enclosure connected to one of the Thunderbolt ports using an Apple FireWire to Thunderbolt adapter.
The 2007 Mac Pro has an Avid HD Native card installed with an HD OMNI Interface connected. The 2013 Mac Pro has the HD Native Thunderbolt box variant with the same HD OMNI Interface connected during testing.
Testing on the 2007 Mac Pro
The test session runs at 96 kHz and 24-bit. Using these session specifications, Pro Tools 11 HD is able to run a maximum of 128 tracks natively. Later we’ll see how many the new Mac Pro can actually cope with if there are lots of plug-ins on the tracks. The session was initially created on the 2007 Mac Pro to push it to its CPU limits. At the moment of writing it runs the latest version of Pro Tools HD, which is 11.1.2.
At first the Playback Engine settings are set to get maximum performance out of Pro Tools. The Hardware Buffer Size is set to 1024 samples. Even though this is the Input Buffer meant for low latency during recording, it still reserves some CPU power when you are only playing back. The playback buffer size is set automatically in Pro Tools and can’t be altered manually. To have an honest comparison with Logic in a later post, I turned off the Disk Cache and Dynamic Plugin Processing options. And to be alerted when Pro Tools has received an error during processing, I turned off ‘Ignore errors during playback/record’.
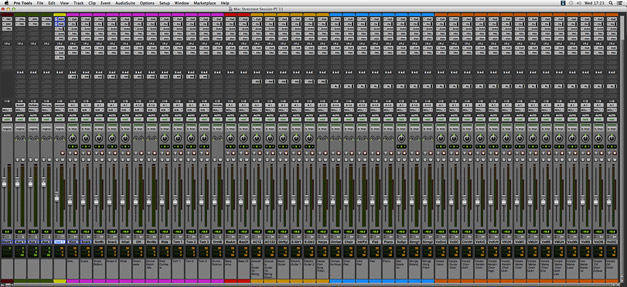
Despite the jumpy CPU bar the session runs very well and I can even record an extra track with a low enough latency at a 128 sample buffer size. The track counter stops at 31 mono Audio tracks, 10 stereo Audio tracks, one Instrument track, three Aux Input tracks and a Master track. All tracks, except for the Master and Aux tracks, contain seven plugins. These are two Sonnox Oxford EQ, one Oxford Dynamics, one Native Instruments Driver saturation/distortion, a T-Racks Classical EQ, the Elysia Niveau Filter and a T-Racks Quad multiband compressor. The Aux tracks each have an Oxford Reverb plug-in followed by the T-Racks Linear Phase EQ with the oversampling and linear phase function switched on. The Instrument track contains Massive followed by the same seven plug-ins from the audio tracks. The Master track has the same Linear Phase plugin followed by Native Instruments’ Solid Bus Compressor and a T-Racks Brick Wall Limiter. The track count might not seem impressive at first, but remember that the session has a 96 kHz sample rate, so all plug-ins process at 96 kHz.

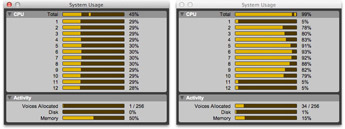
System Usage respectively during stop, stop with Dynamic Plug-in Processing turned on, and during playback.
Notice that the disk meter in the CPU Usage window hovers around 40%. That’s all 41 tracks being played from the one Seagate Barracuda drive. The drive could probably handle a lot more tracks, but I advise you to use at least two drives or a RAID system if you want to record more than 40 tracks. Especially for high pressure and high prestige projects. Avid officially supports no more than 30 tracks on one hard disk when using the ‘normal’ Disk Cache setting. If you use a higher Disk Cache setting to load the complete Pro Tools HD session into RAM, you of course have less of an issue with the drives. But even then, make sure you always have extra drives connected or available where you can save your session to in case your main drive fails or you come short in RAM.
Installing Pro Tools HD Native
The Pro Tools HD Native set in my studio is basically transported from the old to the new Mac Pro. Instead of putting the HD Native PCIe card into an external Thunderbolt PCIe chassis, I opted for the Avid HD Native Thunderbolt breakout box. Performance should be identical to the PCIe card. A big advantage of the Thunderbolt box is that you get an extra and very loud headphone amp that is a welcome addition and sounds really good.
The HD Native box is installed within minutes. It comes with a long Thunderbolt cable that also supplies the power to the box. It’s a very straightforward box with a Thunderbolt connection, two mini DigiLink connections for external interfaces, one led that can be red or green depending on whether the headphone amp is on or off (you can set this by pressing the pot meter on the front of the box) and an extra power socket if the Thunderbolt port doesn’t deliver enough power. My only gripe with the box, is that it doesn’t give you a Thunderbolt thru port. This immediately takes away 5 of the potential 36 Thunderbolt devices that can be connected to the new Mac Pro (6 ports with 6 devices daisy-chained). I’m not sure if I would be comfortable daisy-chaining 5 devices behind the HD Native box, but the option of connecting at least one hard drive would have been nice.
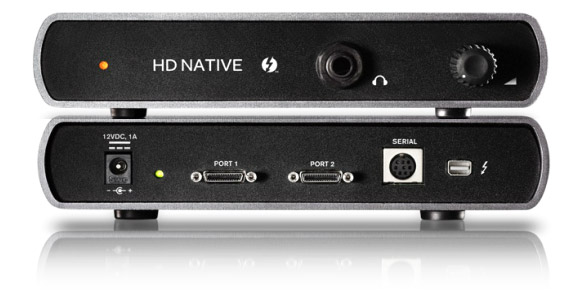
HD Native Thunderbolt box front and rear.
Installing the Pro Tools 11 HD software is a breeze. Just drag and drop it in the application folder, install the HD driver and the Air Creative Collection, and you’re good to go. If like me, you have a large plug-in library, installation doesn’t end there. It took me another full day to install and authorize all my third party plug-ins. If you upgrade from another computer, don’t forget to deauthorize any plug-in licenses from that machine.
Luckily most of the plug-ins in my collection have been updated to 64-bit. The only developer I’m waiting for is Slate Digital. Steven Slate has already let us all know that VTM will be available somewhere in february together with VCC. FG-X will come somewhere in March. Good news is that they are also optimizing the code. Steven even tweeted a screenshot of Pro Tools running 200 instances of VTM without breaking a sweat.
There have been concerns about the iLok not working on USB 3 ports. I can confirm that they work without a problem. Either directly in the USB 3 on the new Mac Pro or in a USB 2 hub. I’m considering getting a USB 3 hub because the four ports on the Mac are already taken. Just like booting the new Mac Pro is really fast (11 seconds until login screen), starting up Pro Tools is also very fast. In a Flash all plug-ins have passed, the only point where it takes a second is when it says ‘Looking for SYNC’. Pro Tools starts up in 5 to 6 seconds in my case. It might be a bit longer if you have more plug-ins.
Testing Pro Tools on the new Mac Pro
It is finally time to run the session on the new Mac Pro. Opening the session is not any faster. That is because I took the hard drive containing the session out of my old Mac and put it into a FireWire enclosure. This is now hooked up to the new Mac Pro via a Thunderbolt to FireWire adapter. The session takes about 22 seconds to open, which is not bad for a session with so many plug-ins inserted. It is a whole different experience though when I open the converted session in Logic. But I will tell you all about this in another post. Just for reference I copy the session onto the new Mac Pro’s fast PCIe Flash drive. The session opens within an impressive 11 seconds. Wow!! Can’t wait for those PCIe Flash drive prices to drop to a more respectable level. I might then replace all my external hard drives for PCIe Flash drives.
It immediately becomes clear what a powerful computer the new Mac Pro is. Everything feels very snappy. Fader movements and meters respond precise to the automation and music. Changing windows, opening plug-ins and scrolling while playing all feel smooth without interrupting playback or the refresh of the user interface (meters, faders etc). The CPU Usage window also reflects the increase in power. The meters show an average position of 45 to 50 percent, a little bit over half of that on the older Mac Pro (see right most meter below). It has peaks of between 50 and 65 percent. I would say the new Mac Pro is about 70 to 80 percent faster.
What strikes me again is that the System Usage meters are jumping a lot more nervously when the session is not playing back. Sometimes the little peak indicator of the top meter jumps to 90 percent, while the average hovers between 55 and 65 percent (See left meter below). This is with the Dynamic Plugin Processing option off. If I turn that on, the meters immediately drop to around 11 percent when the session sits idle (see center meter below). Playing back with Dynamic Plug-in Processing, makes the meters more stable and the average CPU percentage a little lower then before.
With 81 tracks, the CPU Usage meters are now averaging around 85 percent during playback. It shows that the nervous spikes of the meters are nothing to be alarmed about. Increasing the track count makes the average percentage of the meters go up without the session being interrupted by a Hardware buffer size or CPU Error. Even though the top meter spikes at 95% percent every now and then. Once we get to the stage where the average level of the individual CPU meters reach 85 to 90 percent, we start getting CPU errors. This happened somewhere around adding tracks 85 to 90. I had to reduce the number of tracks to 81, to be able to record a new track using a low buffer size.
In between testing I also opened up a live recording session at 48 kHz with about 70 tracks of uninterrupted audio clips. The tracks didn’t have many plug-ins, maybe an EQ on some of the tracks, but the top meter hovered around 5 percent during playback. Very impressive.We have to keep in mind that Avid hasn’t officially qualified the new Mac Pro yet and that performance might improve once Avid updates Pro Tools with full support for the new Mac Pro. That is, if an update is even necessary. Apple though recently released an update for Logic, stating it is optimized for the new Mac Pro. I reckon optimization can only really be gained in the graphic usage of the application. In other words, relaying more graphic processing to the powerful dual FirePro D300 graphic cards. But perhaps Avid can also gain something by optimizing the code for the new Xeon E5 chips. We’ll have to wait and see.
Bouncing the session
We’re at 81 tracks with lots of plug-ins and automation. The question is, does it still bounce to disk using offline bounce? Well, yes it does! But with an average speed of 0.9x. That’s slower than real-time so it is not really beneficial. Real-time bounce also works fine and should theoretically be faster than offline bounce in this situation. I haven’t measured this though.
Some extra tests
For comparison I also ran some other tests, like the infamous DUC DVerb test and the Virtual Instrument test from Pro Tools Expert.
The Virtual Instrument test allowed me to create the maximum number of 256 Instrument Tracks with each an Xpand and Dverb plug-in and have an average CPU load of only 30 percent with spikes up to 45 percent. Recording was a breeze with a buffer size of 32 samples.
The DVerb test resulted in 360 DVerb plug-ins (36 tracks with 10 DVerbs), while still being able to record on all tracks for 5 minutes with a buffer size of 32 samples. And of course the sine wave from the first track stayed uninterrupted. This is in a session with a 48kHz sample rate 24-bit audio.
Do remember that for comparing a Native system with an HDX system you shouldn’t actually use the DVerb plug-in. Apparantly the code of the native Dverb plug-in is not the same as the HDX version. I reckon that is not in the code of the sound algorithm, as I couldn’t hear a difference when I tested this on an HDX system. Avid’s Channel Strip plug-in should have identical code for the native and HDX versions, which makes it a much better plug-in to compare an HD Native system with an HDX system.
There’s one thing strange that I noticed when doing all these tests, especially when recording using a low buffer size. If you look at the second CPU Usage window below, core 1, 11 and 12 are hardly used at all. I did another test recording with a high buffer size and the meters are more evenly balanced. I have no idea where this is coming from. It might have something to do with the new Mac Pro not being tested yet by Avid. I also have the feeling that the CPU Usage window is not actually showing what is really going on with the new Mac Pro. The balance of the CPU meters look more realistic and correct on the old Mac Pro versus the new.Conclusion
The new Mac Pro is clearly one very powerful machine to run Pro Tools natively. Avid might have some optimization to do if I look at the way the CPU Meters respond and if I compare them with the CPU meters from Apple’s activity monitor. If you want to get yourself a new Mac Pro for Pro Tools but are not also using it for any heavy video editing or rendering, I strongly advise you to get the basic model with the D300 GPUs and then upgrade it to 6 or 8-core processor. If you ask me, the new quad-core model is not a smart choice for professional audio. Compared to an i7 iMac the only real advantage is its powerful dual GPU, which you don’t need for Pro Tools unless you’re into post and want to run online 4K footage in Pro Tools. The latest i7 iMac scores only a tiny bit lower on the Geekbench for multicore processing. This doesn’t warrant the high price of the new Mac Pro.
If on the other hand your current machine is a 2006 or 2007 quad-core model, the quad-core model of the new Mac Pro will certainly deliver a significant speed increase. But again I would suggest upgrading the basic model to at least a 6-core CPU. Also upgrade the RAM to a minimum of 16 GB. This total configuration will give you a very powerful machine that can distinguish itself from any current i7 PC or Mac. It will be a huge leap from a 2006 or 2007 Mac Pro.
If you currently own a 6, 8 or 12-core Mac Pro from 2010 or 2012, the speed increase is not as significant as updating from a 2007 – 2009 model. Maybe 15 to 20 percent. For someone with a 2010 – 2012 Mac Pro, the only reason to update would be if you absolutely need Thunderbolt or need the power of the dual GPUs for 4K post production. Today, news got out that the shipping time of a new Mac Pro has slipped to April. So be prepared to spend a long time waiting for your new machine.
That’s it for Pro Tools. Soon I’ll post the same comparison between the old and New Mac Pro using an exact copy of the session in Logic Pro X.
Stay tuned!!
The late 2007 Mac Pro 2,1 has a 32-bit EFI kernel. Without getting too technical, this means you can’t install Mountain Lion 10.8.5 on this machine as it requires a 64-bit kernel. The Xeon Clovertown 5300 CPU is a 64-bit processor though, so it can run 64-bit software without a problem. For test purposes only, I used Chameleon to bypass the 32-bit kernel. Chameleon creates an alternative boot partition that allows the Mac to boot OS X 10.8.5. Simply put, it provides the 2,1 Mac Pro with a temporary 64-bit boot kernel. There is no virtualization involved. OS X 10.8.5 is running directly on the machine. The only thing you do is start up from a special boot partition which then redirects its startup procedure to a regular partition that has Mountain Lion installed.
It runs very stable but I don’t advise using it for professional use, hence the purchase of the new Mac Pro. Now you might ask whether the test is not realistic because of this. Well, Pro Tools 11 HD actually runs on Lion 10.7.5 using Firewire or USB hardware. So I ran the test session on another partition containing 10.7.5 together with an Eleven Rack interface. The results were identical as when it was running under OS X Mountain Lion 10.8.5 with the Chameleon boot partition. The only problem was that I really wanted to test the session using the HD Native system. The 64-bit HD hardware driver though, has a minimum system requirement of OS 10.8.5 and therefore won’t run on OS X Lion 10.7.5. That’s why I used the Chameleon boot kernel to do the testing under Mountain Lion.
Now as far as I know you are technically not breaking the OS X license agreement when you run Mountain Lion on an older Mac Pro this way. Provided that you have an official license of Mountain Lion and you are only runnning it on one Mac. But I still don’t advise nor support using Chameleon. And certainly not for professional purposes. Do remember that this is not the same as installing it on a PC. Make sure you read the license agreement and that you are not violating this nor Apple’s copyright

